This week on our podcast we talked about Christmas cards. I just want to start off by saying that I am a bad card giver. I like the idea of Christmas cards and every year I make the quintessential Facebook post where I ask people to give me their addresses (even if I already have them) if they want a Christmas card.
After I collect these addresses (and they are usually from the same hopeful people that still believe in me), I go out and try to find the wittiest Christmas card that I can find. I feel like I can’t just send a regular card, I have to send a funny card. Last year, I bought Christmas Vacation cards with a smiling Chevy Chase on the front. Every year, I go through the motions of writing out my Christmas cards and packaging them. I address my Christmas cards and then I sometimes even go as far as putting a stamp on them. If it’s a lucky year, the cards even get mailed -- usually in January. However, until I moved earlier this year, I had a box of un-mailed Christmas cards spanning back for as long as seven years. We have already talked about how weird the last few years have been for me anyway. I figured the cards were past sending and when I moved to my new place, I tossed them.
This year, I asked again for addresses. However, I’ve decided to do something different for Christmas cards this year. I’m going to send my favorite holiday recipes to my small address fanbase instead of a generic message in a generic Christmas card.
They say all of the great ideas are stolen and I decided to steal my idea from a post I saw floating around on Facebook. The post said, “for Christmas, I would love to receive Christmas cards. Will you write your favorite recipe inside of the card? Even if we hardly talk, message me for my address if you don’t have it. I would gladly send you one also if you’d like!” So, I shared the post along with this picture and I was flooded with addresses.
As the post became more well-known, I saw other friends sharing the message as well so I sent them my address and they sent me theirs. So far, I have twenty cards to fill out. I’m hoping for more and to get some recipes in return. I would also like to share my recipes with my readers as well. Christen and Cindy will also be participating in this recipe exchange. We have each picked our favorite recipes to share with our readers. Please send us your address by joining our mailing list using this secure form and we will each send you a recipe.
Hi there! It’s Cindy again, and after all the serious discussions about goal setting and grief, I thought it might be time for something light-hearted and fun. So this week on the podcast we’ll be talking about Christmas cards, and we set up a poll on the Modern Musings Facebook Group. We want to know whether you send cards or letters at Christmas, or is this a tradition you have long since abandoned? And for those of you who still send cards, or would like to start, I’ve put together a little post about some simple cards you can make yourself.
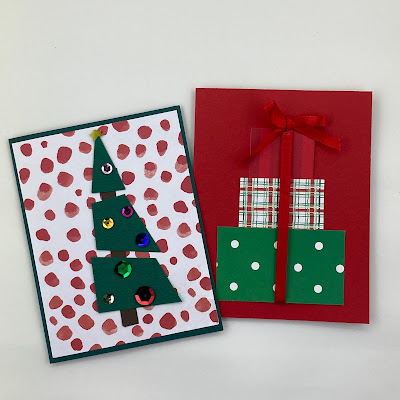
Making your own cards can be a fun way to spend a fall afternoon, and it doesn’t require a lot of experience or supplies. The two cards I have for you today are super easy and require very few supplies, so they are perfect for a beginner card maker. And, of course, an experienced card maker can dress them up any number of ways if they want something a bit more challenging.
Tip: If you are a beginner, start small. Choose to make only one or two of each design and once you’ve done those you can decide whether to make more.
To get started, you will need:
2 card bases, any color (you can make two from one piece of 8.5”x11” cardstock)
1-3 pieces of Christmas themed patterned paper (1 piece for Card “A” and 3 different pieces for Card “B”)
Coordinating green cardstock, approx. 2”x4”
Brown cardstock or ribbon ¼” or ½” wide by 3½”
Coordinating ribbon to match patterned paper
Sequins, rhinestones, enamel dots, stickers, or tiny buttons
Star shaped sequins, rhinestones, enamel dots or stickers
Scissors
Adhesive or glue
Christmas Tree Card
This first card is a modified version of one I sent out to my friends and family 10-12 years ago, and it’s still one of my favorites.
To begin, fold your card base in half and burnish the folded edge with something hard like a bone folder or the back edge of your scissors. If you are using 8 ½” x 11” cardstock to make your card base, cut it in half to make two 8 ½” x 5 ½” pieces; this will be your two card bases. Fold the long edge to make a standard A2 card. Set one aside for the second card.
Cut one piece of patterned paper to 4” x 5¼”. If you like a wider card border, you can cut it to 3 ¾” x 5”. Adhere the patterned paper to the center of the card front with glue or adhesive tape runner, leaving an even border around the outside edge. Adhere the brown strip of cardstock to the center of the card about ½” from the bottom of the patterned paper.
Cut the green cardstock on the diagonal from one corner to make two triangles. Set one aside for a second card. Cut one triangle into four chunky blocks. Adhere these to the brown trunk starting with the largest block about ¾” from the bottom of the trunk, moving upwards with successively smaller pieces and leaving about ¼” or less between the blocks.
Tip: Lay the four blocks out to see what they look like and get the proper spacing, then glue each one down when you are satisfied with how they look
Decorate your tree with sequins, rhinestones, enamel dots, stickers, or tiny buttons as desired.
That’s it! You did it! You made a Christmas card!
Packages Card
For the second card, you will take the second card base and burnish the folded edge just like you did on the first one. Using the three coordinating patterned papers, cut three rectangles measuring 1 ¾” x 3”, 1 ½” x 2”, 1 ½” x 1 ½”,
To stack the packages, place a line of glue or adhesive on the bottom edge of the smallest piece and lay the middle piece on top of it, overlapping by up to ¼”. Then place a line of glue or adhesive on the bottom edge of the middle piece and adhere the largest piece in the same way.
Once your three pieces are stacked and your glue is dry, you can add the ribbon. Adhere one end of the ribbon to the back side of the patterned paper so that the ribbon is right side up when you fold it over the front of the packages. Wrap it around the packages and adhere the other end to the back of the packages.
Adhere the packages to the card base. If you’re good at tying bows, you can add one to the top of the packages for a little extra flair.
Tip: This card works great as a birthday card, too! Just change up the patterned paper!
That’s it for the cards. I hope you enjoyed making them, and if you want to see more of my cards and projects, you can check out my Crafty Neighbor blog and Instagram pages. But if you like the look of homemade cards but don’t want to make them yourself, check out my Etsy shop! And don’t forget to tune in to our podcast starting Wednesday when we talk about this tradition.